Japanese vs German Knives: Which One Is Right for Your Kitchen?
As any home cook or professional chef knows, having the right knife for the job is essential in the kitchen. With so many factors to consider, choosing the right knife can be overwhelming, especially when it comes to the two heavyweights in the knife-making world: Japan and Germany. In this article, we’ll take a closer look at Japanese vs German knives, their differences, and which one may be right for your kitchen.
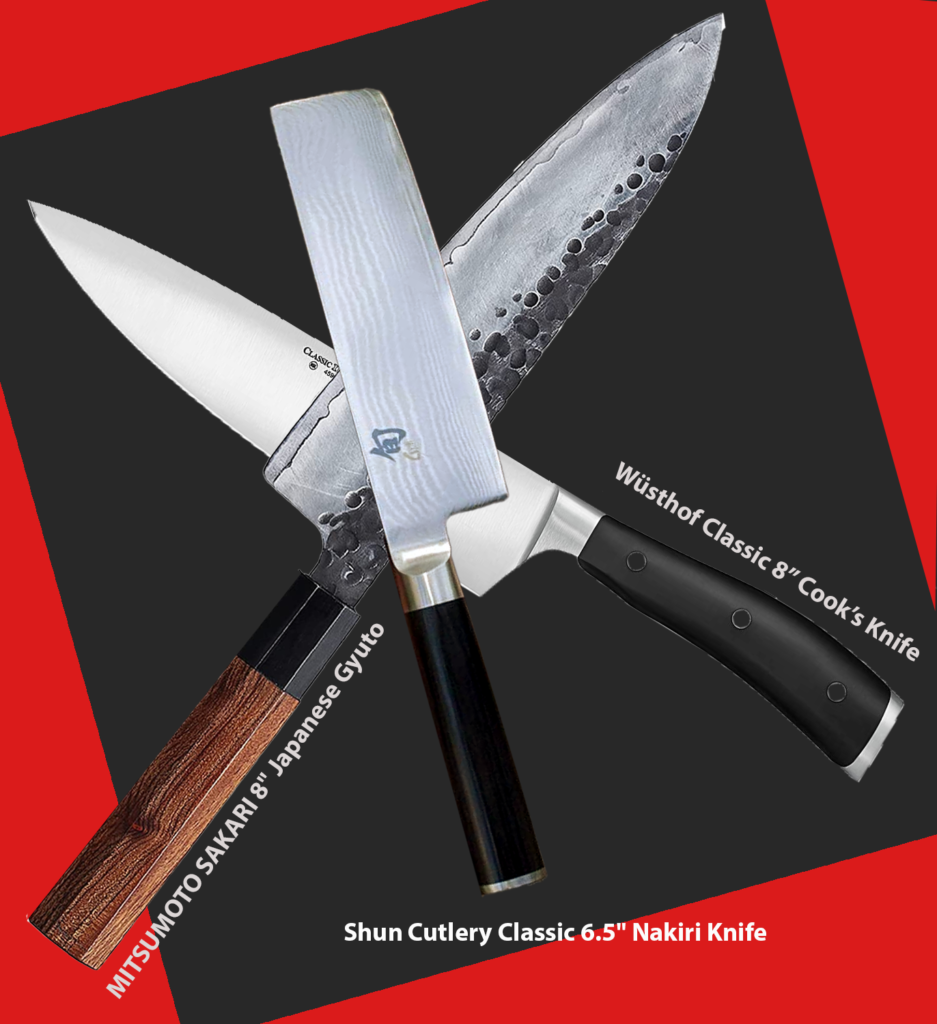
Japanese knives are famous for their sharpness and delicacy, and they’re often considered works of art. These knives are crafted using high-carbon steel that is heated and folded multiple times, resulting in a hard and sharp blade that is a little more difficult to sharpen, but retains its edge longer. The manufacturing technique produces a thin and delicate blade that is perfect for precise cuts of fish, meat, or vegetables. Japanese knives are also known for their unique blade shapes that are designed for specific tasks. For example, the Gyuto knife, like the MITSUMOTO SAKARI 8″ Japanese Gyuto, is the Japanese version of a chef’s knife that combines the shape of a traditional Western chef’s knife with the lightweight design of a Japanese knife, while a Nakiri knife, like the Shun Cutlery Classic Nakiri Knife, is designed for precise vegetable cuts.
In terms of handle comfort, Japanese knives usually have a traditional wooden handle that’s lightweight and ergonomic, fitting comfortably into the hand. However, this type of handle may not be as durable as other materials and may require more maintenance. Japanese knives are often more expensive due to the complex manufacturing process and high-quality materials used in the manufacturing process.
On the other hand (or actually IN the other hand), German knives, like my favorite workhorse knife, the WÜSTHOF Classic IKON 8″ Chef’s Knife, are known for their durability and versatility and is easier to sharpen. These knives are made with softer stainless steel and have a thicker blade that’s good for more heavy-duty tasks like cutting through bones or tough meat. Also, German knives often feature a wide, curved blade that allows for a rocking motion when cutting and slicing through meats or vegetables.
In terms of handle comfort, German knives often have a heavier handles made of durable materials like rubber or polymer for a comfortable and secure grip. While this type of handle may not be as traditional as a wooden handle, it’s more durable and requires less maintenance.
Which One Should You Choose?
When deciding between Japanese and German knives, it ultimately comes down to personal preference, cooking style and the type of food being prepared. Japanese knives are ideal for precise cuts and delicate tasks, while German knives are more versatile and can handle a wide range of tasks. It’s important to consider factors like blade sharpness, durability, weight and handle comfort before making a decision.
Despite having used German knives throughout my life, I have been gravitating towards buying and using Japanese knives more frequently these days, and the reason are:
- Sharpness: Japanese knives are known for their incredible sharpness due to the harder steel used in their construction. This allows for precise and clean cuts, especially when working with delicate ingredients like fish.
- Lightness: Japanese knives are generally lighter and thinner than German knives, which makes them easier to maneuver and control. This can be particularly beneficial when performing intricate tasks like chopping herbs or making small cuts.
- Precision: The blade shape of Japanese knives tends to be more slender and tapered than German knives, allowing for more precision and control when cutting. This can be especially useful when filleting fish or performing other detailed tasks.
- Versatility: While traditional Japanese knives are designed for specific tasks, such as the deba knife for fish or the nakiri knife for vegetables, many modern Japanese knives are designed to be versatile and can handle a variety of tasks.
- Aesthetics: Japanese knives attend to be more visually appealing than German knives, with intricate and beautiful designs and finishes.
That being said, both Japanese and German knives are highly regarded by professional chefs and home cooks alike for their unique features and exceptional quality. Despite their differences in manufacturing process and design, both types of knives share an appreciation for craftsmanship and attention to detail. Whether you choose a Japanese or German knife, investing in a quality knife that fits your needs will make all the difference in the kitchen.
No matter which style of knife you choose, it’s important to make sure it stays in great shape and selecting an appropriate wood cutting board is just as essential as selecting the right knife, as it will affect the lifespan of your knives, as well as your food preparation skills and safety. A cutting board plays a vital role in maintaining the sharpness of a knife blade. When you use a knife on a hard or rough surface, such as a countertop, glass, ceramic plate or even a plastic board, it will quickly become dull due to the friction and impact. However, a good wood cutting board provides a stable surface that absorbs the impact and reduces the friction between the knife blade and the surface, thus preserving its sharpness for longer. By using a suitable cutting board, you can prevent your knife from becoming dull quickly, reducing the need for frequent sharpening and prolonging its lifespan.
When all is said and done, opting for a sturdy German knife or an elegant Japanese knife and selecting an appropriate cutting board can significantly enhance your kitchen experience and make meal preparation an enjoyable task.