The Secret to Perfect Pancakes – A Mathematical Solution!

Foodgawker-Pancakes-Blog-FinalI always have a problem preparing the right amount of batter for the number of pancakes I want to make. Some apparently very hungry math students from the University of Sheffield have swapped calculus for the kitchen and developed  an interactive Perfect Pancake Calculator to make the prompt preparation of perfect prize-winning pancakes a piece of cake (alliteration!). You just enter the number and thickness of the pancakes you want and it gives you the exact amounts of the ingredients you need. One minor problem…Univ. of Sheffield is in England, so the measurements are metric!


Where did that Cut of Beef come from and What the Hell do I do with it?

Mystified by the incredible assortment of beef cuts out there and what to do with each of them? Here is a great Cheat Sheet for Meat Treats by visually that literally breaks down the cow and gives you the name of each cut, where it comes from, an idea of how much it costs and the best method to cook it. Load this cheat sheet to your mobile phone and pull it up next time you’re shopping for meat.

Cuts of Beef


How to Keep Your Knives Sharp…for (practically) FREE!

Click on photo for a closer look

Now that you know the best way to sharpen your knives (see previous post for the  Accusharp Knife and Tool Sharpener)…here is the best and cheapest way to keep them sharp. Every time you put an unprotected knife in a drawer you run the risk of ruining the edge. It just takes a little bump to bend or roll the delicate edge of a sharp knife, and although honing with a good sharpening steel is something you should be doing, as it will straighten out the blade’s edge, it doesn’t actually sharpen the knife. Over time the knife will start to dull, until one beautiful summer day while you’re futilely attempting to slice a tomato for a BLT, the knife slips off the fruit (yes, the tomato is a fruit…look it up) and lops off your entire thumb (ok…that’s a little dramatic, but I’m trying to make a point here). Of course, you can buy knife guards, but it’s exceptionally easy to make them at home. All you do is take some cardboard (the thin kind from a gift box works best, but any cardboard will do), cut a long strip that’s the length of the knife’s blade and a little more then twice as wide as the blade, fold it in half length-wise to fit the knife, and just staple evenly down the open edge. Slip this on whenever you store your knives, and they’ll stay sharp no matter how much they rattle around in that overstuffed drawer.

Simple Knife Sharpening – The Best Tool for the Job

I love my knives and, as incongruous as it might sound, a sharp knife is a safe knife. When a knife is dull, more pressure is needed when using it and that increases the chance that the knife will slip and do some damage…a sharp knife is not only much easier to control, but it really adds to the joy of food preparation.

Sharpening a knife using a sharpening stone is best left to professionals. It’s a great skill to learn, but it takes a lot of practice as it’s tough to get the proper angles. The Accusharp Knife and Tool Sharpener is an inexpensive, safe and easy to use tool that makes knife sharpening a pleasure. It has diamond honed tungsten carbide sharpening blades set at the proper angle so you can’t make a mistake, and in about 10 seconds, you have a nice, sharp edge.

The are a lot of myths and facts about knife sharpening, but if you use the right knife for the job and you keep it sharp, you’ll find food prep to be a pleasure.

No need to go crazy buying knifes. I recommend starting out with a good quality 8″ chef’s knife (the workhorse!), a 3″ paring knife, a 5 1/2″ boning knife, 5″ Tomato/Utility Knife, an 10″ serrated bread knife and a honing (sharpening) steel. Just make sure you store them properly (I love my magnetic knife holder) and you should be ready to tackle any kitchen cutting job with ease.

Summer’s Here and the Time is Right…for Fruity Yogurt Smoothies

It’s finally summer, so it’s time once again for the best breakfast ever…Healthy Fruit Smoothies. The great thing about the following technique is that you can substitute just about any fruits and juices that you like…it’s all good.  For this Hawaiian smoothie, I took fresh picked papayas and bananas, cut them into chunks and froze them overnight. To make the smoothie, put about a cup of frozen papaya chunks, a cup of frozen banana pieces, 6 oz. of your favorite blueberry yogurt (I use Dannon) into a blender and add about 3/4 cup of V8 Splash (available everywhere…I use Tropical Blend, but any flavor you prefer will do). Pulse the blender for about 30 seconds, and if necessary, give it a quick stir (make sure the blades have stopped!), and repeat a few times. If it appears too thick at this point you can take the top off the blender while it’s running (make sure all the fruit has been pureed before you do this or you may end up wearing some smoothie) and slowly pour in a little more Splash until you see a vortex begin to form in the center-you’ll know what I mean when you see it happen-and the Smoothie will have a perfect consistency. If you love peanut butter like I do, you can add a heaping tablespoon (I prefer chunky) and blend for a couple of seconds more…it’s incredible!  For convenience, you can buy bags of chunked frozen fruit just about anywhere. I love the Costco brand..it has peaches, strawberries, pineapple and honeydew and comes in a 6 lb. bag. The secret, though, to a really great smoothie is the frozen bananas (I always keep a baggie full of frozen banana chunks in the freezer)…that’s what gives it the amazingly creamy consistency.

The Most Important Tools in Your Kitchen – Your Knives

A sharp, well balanced knife that feels good in your hand is a pleasure to work with and makes cooking that much more enjoyable…when the right knife is used properly, it really makes you feel very “cheffy”. I’ve already posted how to sharpen knives and keep them sharp, and the amazing chart below (which I totally copied from Kitchen Kapers) really helps you figure out exactly what knife to use (or buy) for the job at hand.

There is need to go crazy buying knifes. I recommend starting out with a good quality 8″ chef’s knife (the workhorse and the most important tool in your kitchen, imho), a 3″ paring knife, 5″ Tomato/Utility Knife, a 10″ serrated bread knife and a honing (sharpening) steel. Just make sure you store them properly (I love my magnetic knife holder) and you should be ready to tackle any kitchen cutting job with ease.

Style of Knife Shape of Knife Ideal Job for Knife
2 3/4″ Peeling Knife For peeling of all round vegetables – potatoes, onions, etc.
3″, 4″ Paring Knifes For paring, peeling and slicing small fruits and vegetables.
5″ Tomato/Utility Knife (Serrated) For tomatoes, salami, croissants.
5 1/2″ Boning Knife For separating meat from bone, cooked and uncooked. The smaller the size of the meat (or bone) the more flexible the blade should be and vice versa.
5″, 6″ Utility Knives As the name indicates, for many, but not for all cutting jobs. Peeling, slicing, chopping, carving.
8″, 10″ Carving/Slicing Knives For carving medium sized roasts and fowl, cutting large vegetables, fruit.
6″, 8″, 10″ Chef’s Knives For chopping and dicing. The knife handle is rocked up and down with one hand while the fingers on the other hand rest slightly on the back of the blade, towards the tip.
8″ Bread Knife (Serrated) For cutting bread or any other food of soft substance with a tough skin or crust.
5″, 7″ Santoku Knives For slicing and chopping. Hollow edge allows air between blade and item being cut for extra thin cutting. Unique edge must be sharpened by professional.
Cleaver For chopping through joints or bones.
10″ Sharpening Steel For sharpening the knives. A sharp knife will provide maximum safety. Use the sharpening steel regularly, preferably every other time the knife is used.

DIY Girl Scout Cookies – How to Make Them at Home

It’s that time of year again…Girl Scout Cookies are on sale! For those of you that are still bummed out over the news last year that the Girl Scouts cut back on the varieties (it was huge national news…just check out The Wall Street Journal), there is help online. One of my favorite blogs, Baking Bites, has a great post on how to make your own. And if your favorite cookie isn’t covered in that post, check out Chow. Fijis, Slim Mints, Do-Si-Dos, Samoas, Tagalongs…they’re all there for the making. Even if your favorite wasn’t scratched from the line-up, you should give these recipes a shot. Not only do they taste better when you make them yourself, but you also get a wonderful feeling of accomplishment that helps negate that horrible feeling you get when you look in the mirror after gorging yourself on them. And after you’ve had your fill of Girl Scout cookies, check these out, the Best Chocolate Chip cookies ever invented!

Valentine’s Day Chocolate Bag of Treats

chocolate bags
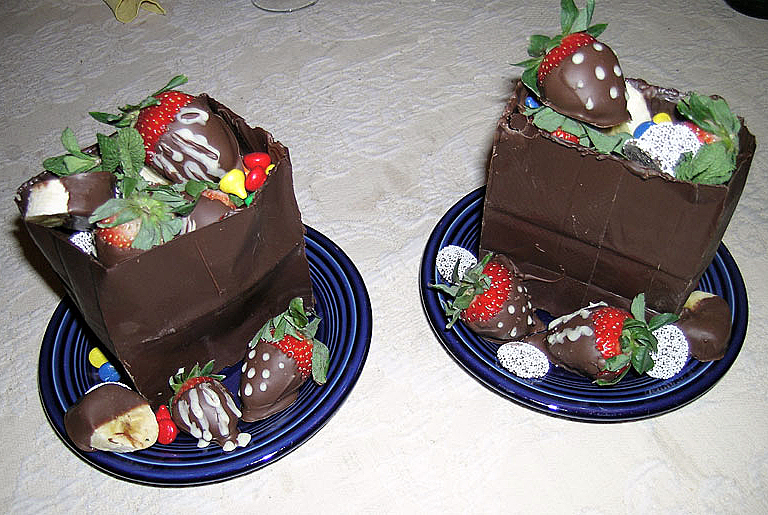
Here is one of the all-time great Valentine’s Day recipes (and it’s not really a recipe…more like a really impressive technique). I actually made these for the first time years ago, long before I really got into cooking, so although it might look like it’s hard to prepare, it really isn’t…and it’s a lot of fun!

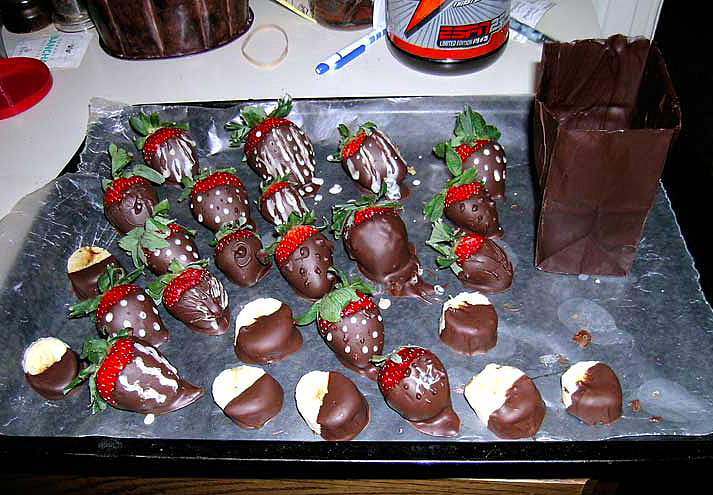
1. Get a few coffee-bean bags from your grocery store. You need bags that are lined with a plastic coating so after being painted with chocolate, you can peel them off easily. Cut the coffee bags so they are about 3-5 inches tall.

2. Then, in a double boiler over low heat, melt 2-3 cups of semisweet chocolate morsels.

3. Lay the bag on its side and with a pastry brush, starting at the bottom, paint the melted chocolate over the entire interior of the bag. Use plenty of chocolate to get a nice thick coating, which will make it less likely for the chocolate to break when peeling off the bag.

4. Stand the bags up and place in the refrigerator for at least 30 minutes. They can be left in there until you need them.

5. When the chocolate is nice and hard, starting in one corner, gently peel away the bag. Use a scissor to cut the paper off as you peel it…it just makes it easier.strawberries and bags

6. Melt some more chocolate and dip strawberries, sliced bananas and whatever else your significant other loves into the melted chocolate. Lay them down on waxed paper to dry and harden. As very cool added touch, you can also melt some white chocolate and use that to drizzle designs on the dipped treats.

Then just fill the bags with the treats and your favorite candies and you have an incredibly impressive presentation for your loved one on Valentine’s Day. It sure sealed the deal for me!

Caramelized Onions, Sausage and Mushroom Sourdough Whole Wheat Pizza

SMO PizzaGot a few pizza questions recently, so I just wanted to re-post a pizza story I did a while back. This was, of course, made from scratch (here’s the recipe) and it really tasted just as good as it looks. One of the most important tricks to making a great pizza is using a pizza stone (or even better, a pizza baking steel, which is what I use exclusively now)…it’s hard to bake a great crust without it. Both the stone and the steel have a greater thermal mass then either a glass or metal pan and therefore hold and distribute heat much more efficiently. The stone is also porous, so it absorbs moisture from the dough as it cooks, all of which contributes to an amazing crisp, uniformly browned crust. Also, definitely get yourself a pizza peel…they’re inexpensive and make putting the pizza in and taking the pizza out of the oven a breeze.

Pizza stones and steels are available just about everywhere, and come in a variety of sizes and shapes (and prices). They should be put in a cold oven, then preheated for at least 30 minutes after the desired oven temperature (I recommend 500°) is reached before using. Because the stones are porous and absorb liquid, the stone should never be washed with soap…just a dry brush or some plain, warm water if needed. Both the stone and the baking steel are ideal for baking bread.

t stone or piece of ceramic or earthenware used to evenly distribute oven heat to pizzas or other baked goods, more or less mimicking the effects of cooking a pizza in a masonry oven. Such bakeware has more thermal mass than metal or glass pans. The porous nature of the stone used also helps absorb moisture, resulting in a crisp crust.
Suasage, Mushroom, Caramelized Onion Pizza ready for oven
Ready for the Oven

Nothing better then homemade pizza and this crust is simple and delicious. If you need sourdough starter, check out my bread post from last week. I prefer thin crust pizzas (being from the New York area…where we make REAL pizza), but if you prefer a thicker crust, it’s all here in the printable recipe. This is one of those recipes that appears to be a little vague at first, but once you try it and get the feel for how the dough should come together, it’s simple and quick to replicate whenever you get the urge…which for me, seems to happen about 3-4 times a week lately. And since the recipe makes 3 crusts which freeze incredibly well, you actually don’t have it make it that often. Just take one out of the freezer, and in about 3 hours, it’s ready to roll. The crust is also vary versatile and can be used in dozens of different ways. Just the other day, I topped one with just caramelized onions, crumbled goat cheese and drizzled some olive oil on it and it was amazing. It also makes a great calzone!

Please click here for the printable recipe.

Tip of the Day – Never Refrigerate Bread…Freeze It!

Sourdough Whole Wheat BreadThe best way to keep bread is at room temperature. After 2-3 days, you should wrap the bread well, put it in a freezer bag and freeze it.  Never store any bread in the refrigerator, because the cold temperature (38º-40º) accelerates the crystallization of the starches, causing the bread to stale much faster. When I bake a bread, as soon as it cools completely, I cut it, freeze half immediately and keep the other half cut-side down on a cutting board covered with a clean cloth. When that’s consumed, I take out the frozen half, defrost it at room temperature or wrap it in foil and bake in a 450º oven for 10 minutes and it tastes just as good as the day it was baked.